Let’s get started!
Before we start, please note that the Cinedeck AMI is located in the us-east-1 region, so please make sure you have the correct one selected on the right top of the page.
Note** If you need it in a different region, please feel free to send a support tickethttps://cinedeck.com/contact/ . We will reply to you shortly.
STAGE 1
Please log in the AWS console by following the link https://console.aws.amazon.com/console/home?region=us-east-1#
You can easily set up your AMI instance by following these steps:
1. Choose AMI:
Please choose EC2 in the “Services’-‘Compute’ section, which you will find on the top left side of the console.
Click AMI in the ‘Images’ section in the left side menu.
You will be transferred to the page with a list of AMIs. Please click the line with Cinedeck Server 2.0. (1)* Test , and right mouse click-‘Launch’ to proceed.
Note! *AMI versions can vary.
2. Choose an Instance Type:
Find ‘Filter by’ menu- ‘All instance families’ and click ‘g4dn’, which is in the second column. Here you are welcome to choose vCPU that suits best at the moment. So please click the corresponding line and click ’Next: Configure Instance Details’ at the right bottom side of the page.
3. Configure Instance Details:
You are on the page where all data is pre-set by default. Feel free to either change any field if needed or go ahead and click ‘Next: Add Storage’. See the right bottom page side.
4. Add Storage:
Here you can see two discs: a ‘root’ system disc. Please make sure to leave them both (root and EBS) as you won’t be able to use ‘root’ disc for recording.
Your instance will be launched with the storage device settings as follows.
If requested,
You can attach additional EBS volumes by clicking the ‘Add New Volume’ button and change settings of both root and additional volumes.
When all is set here, click ‘Next: Add Tags’ in the right bottom corner.
5. Add Tags:
On this step, click the ‘Add Tag’ button and create a key, value if needed. If not, just skip this step and click ‘Configure Security Group’.
Make sure your IAM policy includes permissions to create tags.
A tag consists of a case-sensitive key-value pair. For example, you could define a tag with key = Name and value = Web-server. A copy of a tag can be applied to volumes, instances or both. Tags will be applied to all instances and volumes.
6. Configure Security Group:
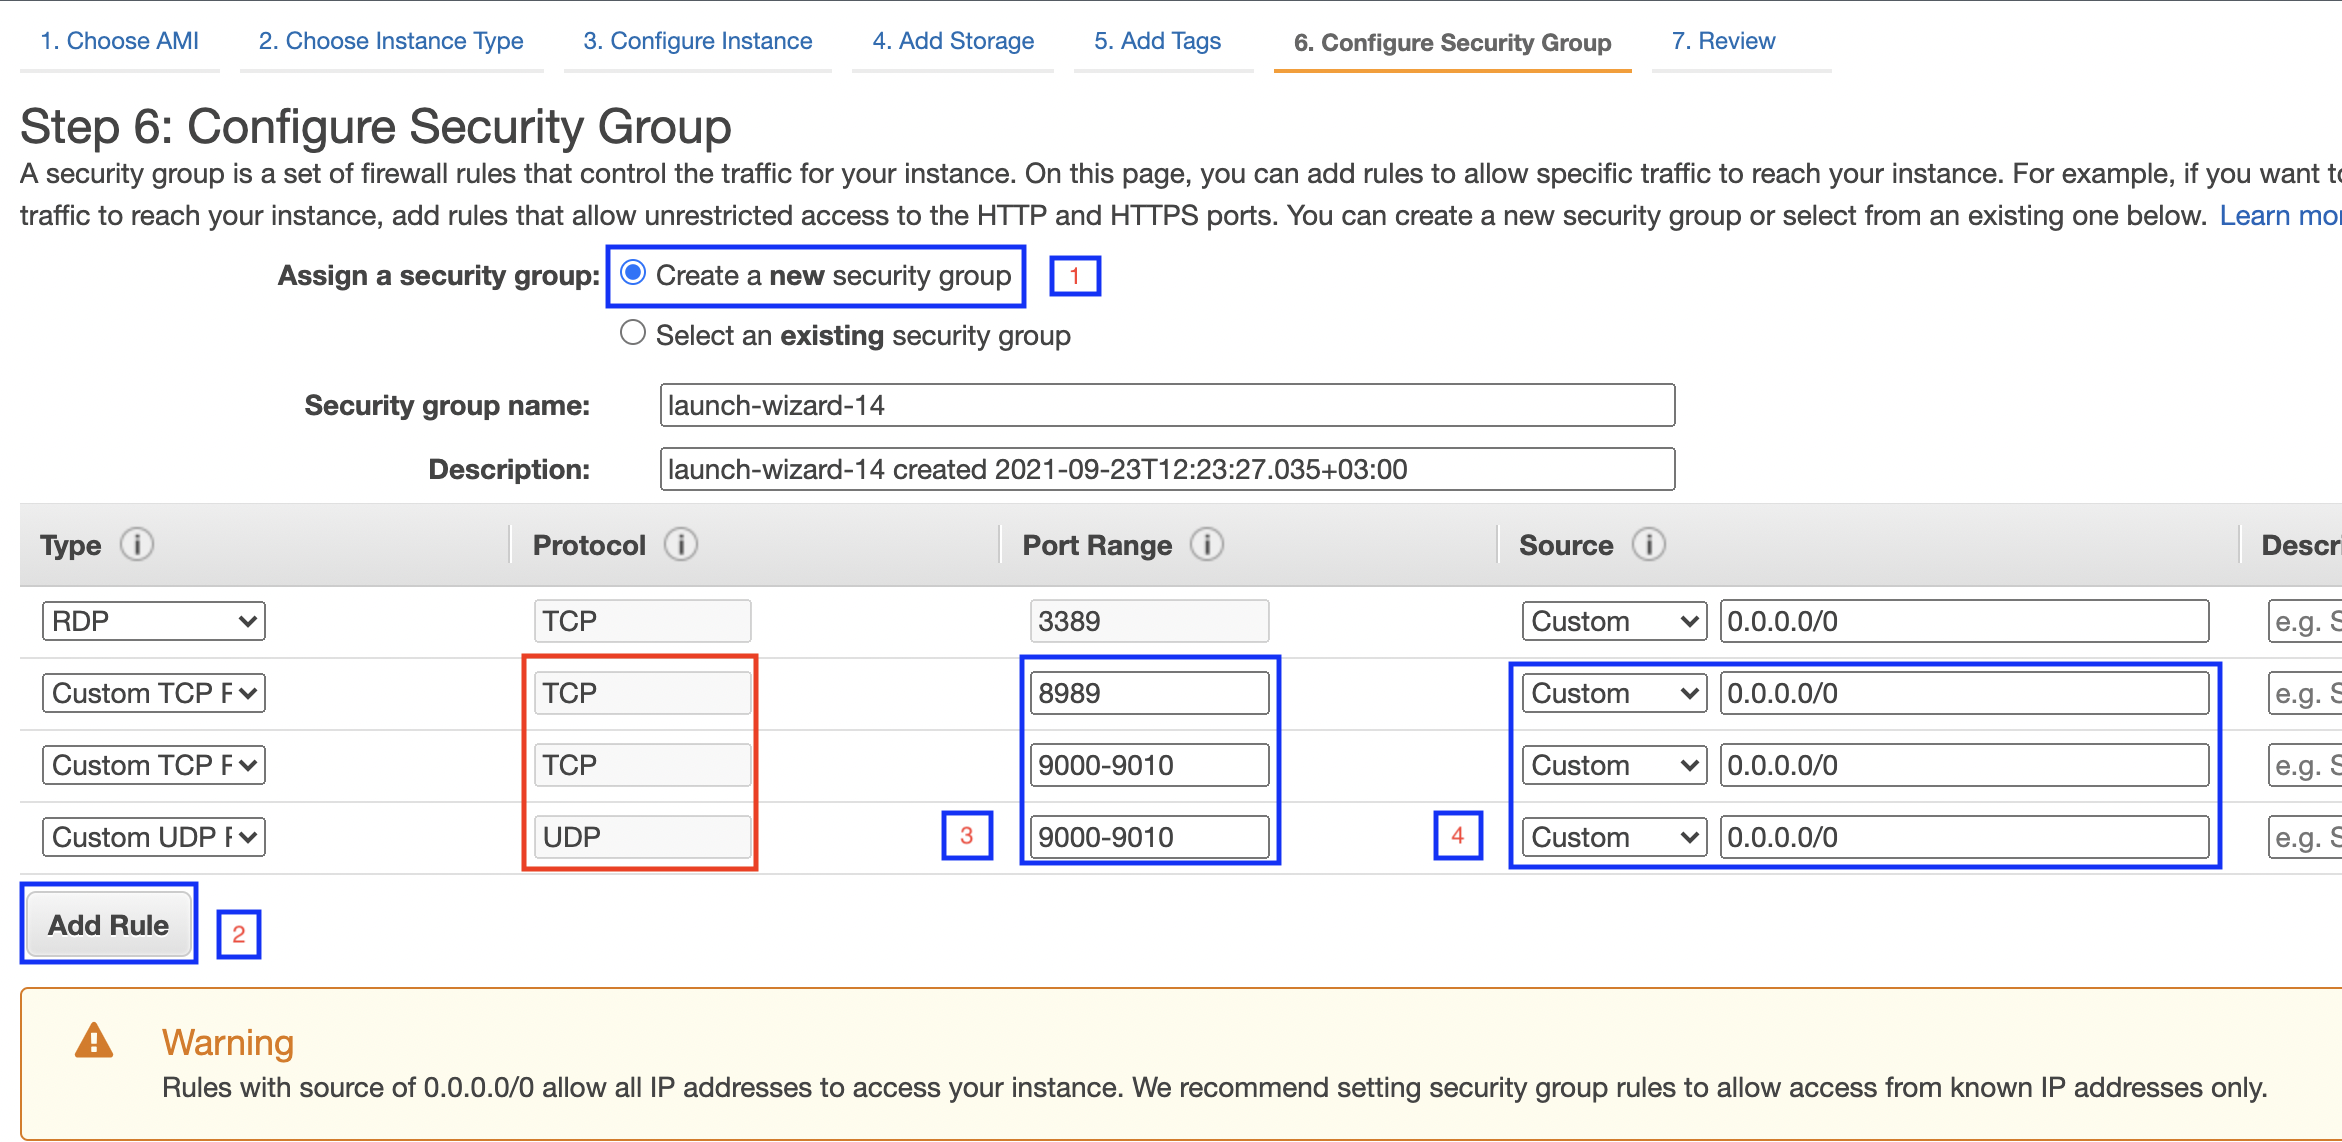
This step is to set up rules to control the traffic for your instance. To complete it, please:
Create a new or choose an existing security group
Add the following rules (click ‘Add rule’ button):
custom TCP rule with the port range 8989
custom TCP rule with port range 9000-9010
custom UDP rule with port range 9000-9010
Preview: custom TCP rule with the port range 9050-9060
At the end, just hit ‘Review and Launch’
7. Review:
You can review your setting details here. If you need to make corrections, you can apply changes by clicking ‘Edit’ from the corresponding section.
Please note, you can make changes at any step by choosing the necessary 'Step” in the toolbar on the top of the page, click ‘Previous’ bottom right of each page:
If everything looks right, click the ‘Launch’ blue button in the bottom right corner.
Once done, you will see a pop up window, asking you to either generate a new key or use the existing one.
8. Creating a new key pair.
This private key is required to obtain the password used to log into your instance:
To create a new key, please select ‘Create a new key pair’ in the drop down window and type in the name for it the ’key pair name’ field.
Click ‘Download Key Pair’.
Now Click ‘Launch instance’ and you’ll be transferred to the ‘Launch status’ page. If all is OK, proceed by clicking the ‘View instance’ button.
Here you can edit the name of your instance and proceed by hitting ‘Connect’:
And you are on the step to connect to your instance using the RDP client.
9. Connect your Instance using the RDP client
Choose an option and click ‘Get password’ and please give it 4-5 minutes to get created.
Once done, you will be asked to decrypt the password. This can be done by ‘browsing to your key pair’ or copy and paste the contents of them. Then click ‘Decrypt password’.
Please reload the page to see your password.
Please note, after hitting ‘Get password' , you’ll be asked to wait before retrieving it.
It usually takes up to 5 minutes, but from our experience this might take even an hour. So if you can’t see it in 5 minutes, just wait a bit longer and try to retrieve your password once again:
And you are almost there! We’re done with the AWS console.
Stage 2
1. Launch Cinedeck Client on your PC
**Please make sure to have the Client and Server application of the same version.
Launch ‘Cinedeck client’ on your pc,
choose ‘Superuser’,
Click the icon (see screenshot below):
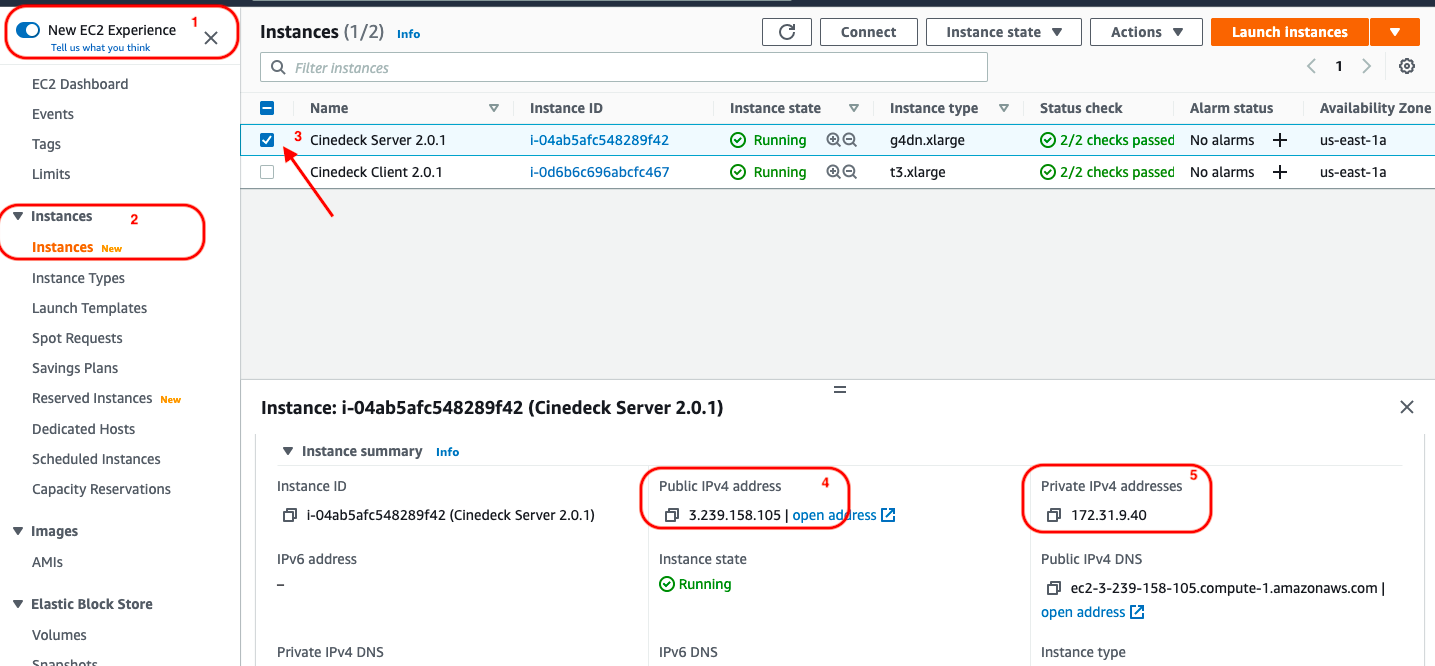
add the Public IPv4 address*, name and let it get connected (you will see a green dot next to ‘IP address you’ve logged) and then ‘Save’ them:
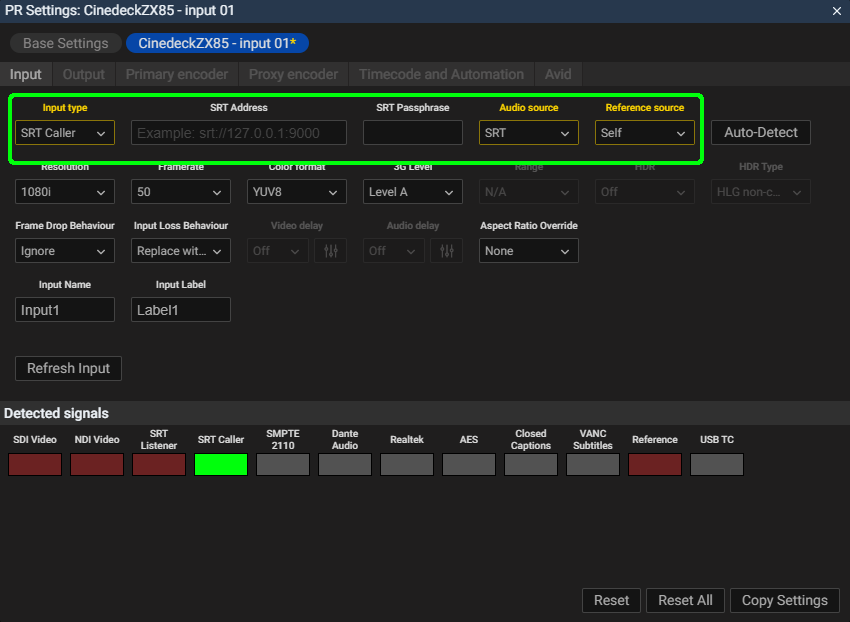
2. Go into 'Input' settings and choose SRT both for:
Input type
Audio source
Input Source SRT Caller:
SRT is supported for H264 and H265 in an MTS wrapper.
Zixi and other containers may be added later. If you have particular needs, please contact sales@cinedeck.com.
Stream should be set to CBR on the encoding device. VBR sources are not currently supported.
SRT Caller mode requires the user to know the public IP address and correct port for the SRT source. If encryption is enabled on the source device/encoder, enter the passphrase in the SRT Passphrase field.
Audio source should also be set to SRT.
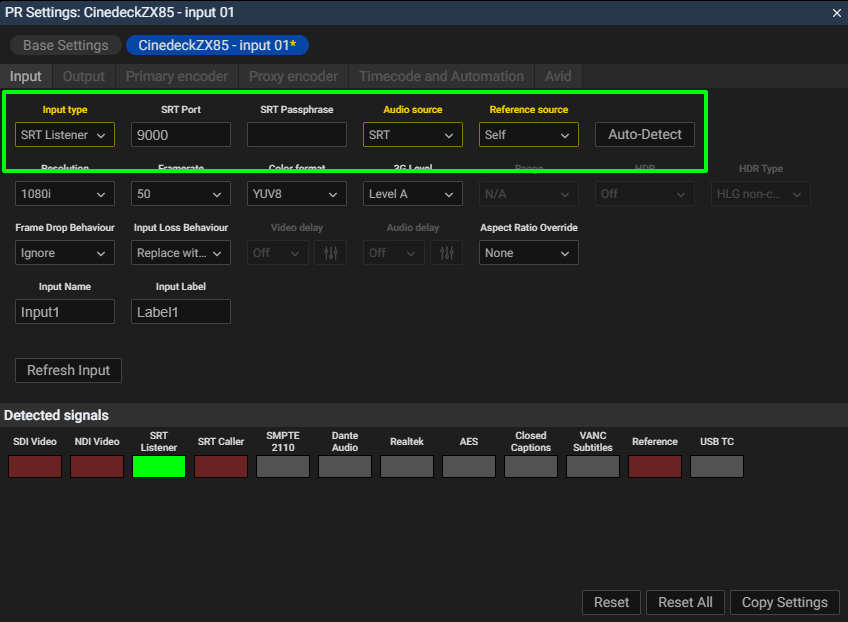
Input Source SRT Listener:
SRT is supported for H264 and H265 in an MTS wrapper.
Zixi and other containers may be added later. If you have particular needs, please contact sales@cinedeck.com.
Stream should be set to CBR on the encoding device. VBR sources are not currently supported.
SRT Listener requires the user to enter both the Cinedeck’s public IP address and correct port for the input channel on the Cinedeck.
If encryption is enabled on the encoder, the SRT Passphrase can be entered here.
The port for input channel 1 on the Cinedeck is 9000, and each subsequent channel’s port is 9000 +N-1, 2 is 9001, 3 is 9002, etc.
And you are on!
Have questions? Log a support ticket here.


Add Comment